
Solving yesterday's problems today
© 1999-2023 Jürgen Müller
juergen@e-basteln.de
Solving yesterday's problems today
© 1999-2023 Jürgen Müller
juergen@e-basteln.de
Most of the old games expect a 4-way joystick, but some are meant to be played with an 8-way stick. But there is definitely no room for dual joysticks in the Verticade – the control panel will be only 20 cm wide.
MAME has a feature where you can always use an 8-way stick, and limit the signals sent to the game to pure 4-way. I bought a Sanwa JLF joystick and initially thought I would use software or electronic restriction for 4-way games, but wasn’t happy with the way it felt. I guess I was too cheap to discard the Sanwa and buy a Mag-Stik Plus instead – and had read mixed reviews regarding the Mag-Stik’s feel. So here is what I came up with:
The idea is to make the Sanwa JLF switchable between 4-way and 8-way operation from the top, by turning the joystick knob – much like the Mag-Stik. After a bit of fiddling this has turned out very nicely for me. The picture below shows my final design. A slender T-bar has been added to the end of the joystick axis. During normal play, it never touches the restrictor plate or insert. But if you pull the joystick upwards and then rotate the stick around its axis, the T-bar engages with the two tabs on the insert. You can rotate the insert by ± 45° to switch between 4-way and 8-way mode.
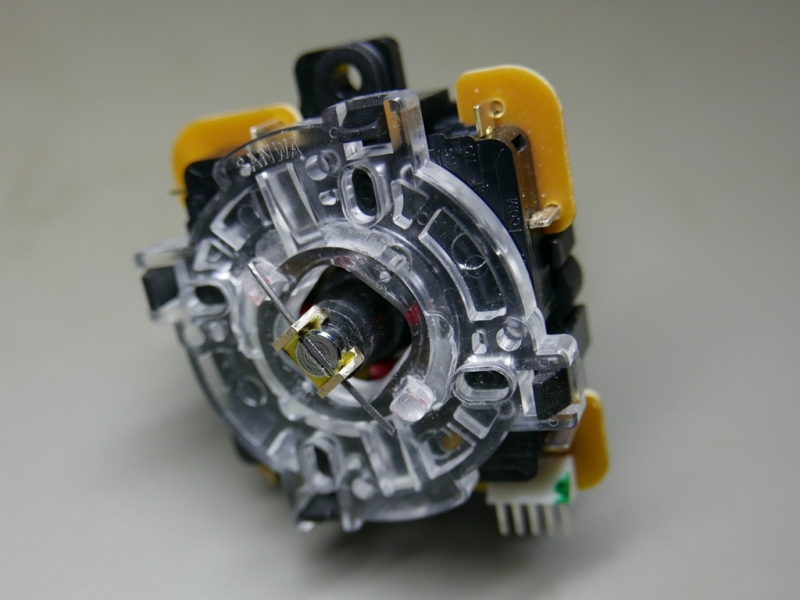
The Sanwa joystick with modified restrictor plate, and an actuator added to the end of the joystick shaft.
If you cannot get the metal bits in your local hardware store, a shop for model makers is probably a good source.
No advanced tools are needed, but some careful work with a drill, milling bit, and a couple of files. Using a drill press is recommended. The change is largely reversible if you should not like it; you will not ruin your joystick. (Worst case, a new restrictor plate may be needed.)
Before you embark on this, please check whether your joystick has enough upwards movement. This is needed to have enough play to engage the switch mechanism later. Pull upwards on the joystick axis and measure how far it can move: I only have my own joystick to check, and it has 2.5 to 3mm of play. But maybe the manufacturing tolerances vary? If your stick should have only around 2mm of upwards movement, you can later trim the actuator if needed, to give it a bit more room to move. But if it is significantly less, the switching mechanism would probably not be able to engage properly. In that case, better stop here (and be pleased with your highly precise joystick mechanism…)
The first step is to make the insert rotatable while it is installed on the joystick. This is a very useful modification by itself:
Remove the transparent restrictor plate from the bottom of the joystick, and remove the 4-way/8-way insert from it. On the large restrictor plate, notice the elevated regions on the guide rail which supports the insert when it rotates – highlighted by the red ellipsoids in the picture below. These stop the insert from rotating, and lock it in its position unless the insert is manually lifted to clear the elevated steps.
The steps need to be milled down to about 1/3 of their original height (above the main guide rail). I used a small milling bit, sold for Dremels etc., in a drill press to have good height control. The lateral position of your tool is not critical, you can take away a bit more material. But the depth should be nice and even to give a smooth rotation of the insert. Don’t mill the steps away entirely, since you want a slight locking action. Cool the milling bit with a squirt of water to avoid melting the plastic.
Do not cut back the two tabs on the insert yet (blue ellipsoids on the photo). This is best done as the last step, to get the height right. Clean and reassemble the restrictor plate, mount it to the joystick, see if you like the feel of manually turning the insert. If the resistance is too strong, mill down a bit more. If the locking action is too weak, go order a new restrictor plate… ;-)
You could leave it here (or go back to this stage later, in the unlikely event that you don’t like the top-operated switching). Being able to switch the stick manually from the bottom, without the need to remove the restrictor plate, is a big improvement already. But while you are at it, why not continue and…
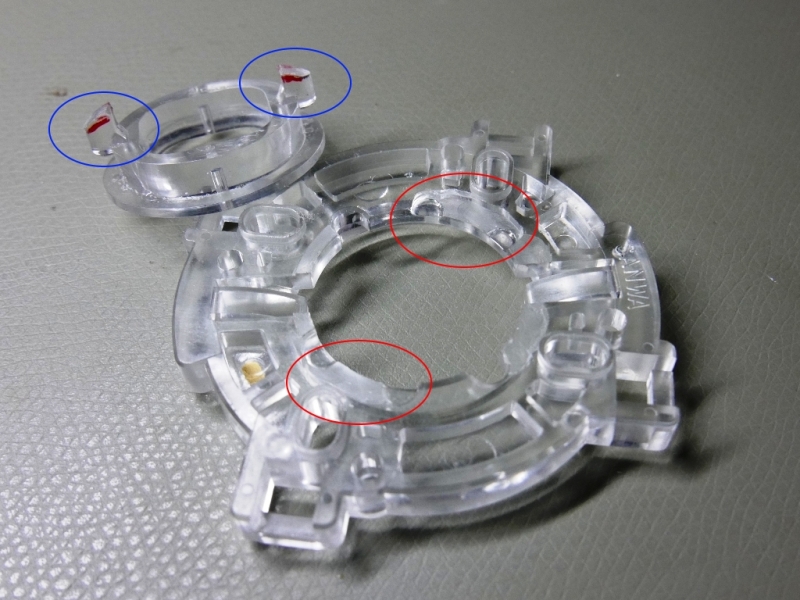
The modified restrictor insert. In the first step, mill down the elevated steps on the large plate only (red ellipsoids). The tabs on the insert (blue ellipsoids) will be trimmed later.
… to allow rotation of the restrictor plate via the joystick knob.
The picture below shows the two new parts you need to make: A metal bracket which replaces the retainer ring at the end of the joystick axis, and a slightly bent piece of 1mm spring steel wire. The bracket slips into the groove at the end of the joystick axis, just as the original retainer ring does. But unlike the retainer ring, it does not need to lock into place by a tight, springy fit. The spring wire, which is threaded through the cross hole and through the slit at the end of the joystick axis, locks the bracket into place.
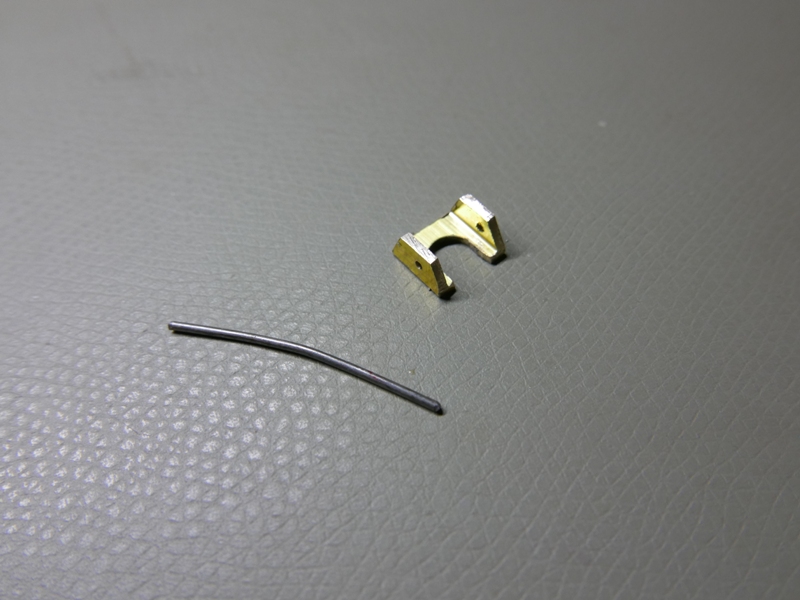
New parts for the actuator: Brass bracket and T-bar made from spring steel wire
I made the bracket from a short piece of brass U-profile: 1mm material strength, 10mm wide, 10mm high originally. (As you can see from the picture, I filed it down to a lower height as the last step.) You could also make it from a piece of flat brass or aluminum which you bend up yourself. Just make sure the whole structure is not wider than necessary, or it will collide with the restrictor plate later when you tilt the joystick. Also, the material thickness must not be more than 1mm, since that is the width of the groove in the joystick axis.
To make the workpiece easier to handle, I recommend starting with length of several cm of material, and cutting off the final short piece later.
Drill the 5mm hole (to fit the groove in the joystick axis) near the end of the profile. File it open into the u-shaped hole as seen on the photo.
Tap the 1mm cross hole for the wire. Measure the height of the slit in your joystick axis carefully, to make sure the wire fully engages with it when threaded trough the hole later, and is a tight fit. Also, both 1mm holes need to be at precisely the same height, so that the wire runs at 90° to the joystick axis.
With a metal saw, cut the bracket to length. Mine is about 9mm long (5mm for the hole, 1mm on the open end of the U hole, 3mm for some substance on the closed side of the bracket). File down the upper sides roughly as shown – the precise shape is not critical, but you will have to take away some material to avoid collisions with the restrictor when tilting and rotating the stick. Just do some test fits and trim as needed.
The T-bar that will engage with the restrictor tabs later is made from 1mm strong spring steel wire (hardened steel wire). You want a T-bar that is as slender as possible, to avoid unintended contacts when tilting and swiveling the stick. You also need something that engages with the 1mm slit in the end of the joystick axis. The steel wire meets both requirements nicely. The hardened “spring” wire quality is required for stability, I think. If you can only get regular steel, that’s worth a try; but don’t bother with brass etc. since they will be too soft.
The wire will need to be bent to a slight curve, so that it approximately follows the circle described by the joystick axis' end when the stick is tilted. This will give a roughly constant clearance between the wire and the two tabs of the restrictor plate in regular operation, while making sure the ends of the T-bar safely engage with the restrictor plate tabs when the stick is pulled up.
Since the wire is hard to bend, I first bent a longer piece, then cut it to length. You want a steady curve in the wire, not sharp kinks, so that the bent wire can still be inserted into and removed from the bracket. Use some suitable mold for bending it – the wooden rolling pin in the kitchen works well…
Then cut off a 30mm piece of wire. A strong pair of wire cutters (side cutters) should just be able to handle this strength of wire.
Slip the brass bracket over the joystick axis, then push the steel wire through the cross hole. If you have worked precisely, this should be a tight fit and may require pliers. The result should look like in the photo below – but the two tabs of the restrictor plate will still be taller than shown.
Rotate and swivel the joystick around. Check whether the bracket or the wire can touch any parts of the restrictor plate besides the two tabs. If the bracket touches anything, it needs to be filed down a bit more. If the wire touches anything, it may be bent too much, or is too long. (No need to make it longer than the outer distance of the two tabs.)
Rotate and swivel the joystick, and make markings on the two plastic tabs of the restrictor gate, to indicate how much you need to shorten them to keep them out of the wire’s way in normal operation. This should result in a line that slopes down as it moves away from the stick’s center.
Cross-check your markings: Pull the joystick upwards; it should have about 3mm play. (Well, mine had. If yours has slightly less play and this stops the T-bar from securely engaging later, you can trim down the black conical actuator on the joystick axis a bit to give it more play. Trim on the wide side of the actuator, which is oriented towards the joystick ball, to avoid changing the action of the stick.) Verify that the T-bar, when pulled upwards, will still touch the insert’s tabs once you trim them.
Remove the steel wire, then the restrictor plate, then its gate insert. File down the insert’s tabs as marked in the previous step. Clean shavings away carefully before reassembling, repeat the above test fit.
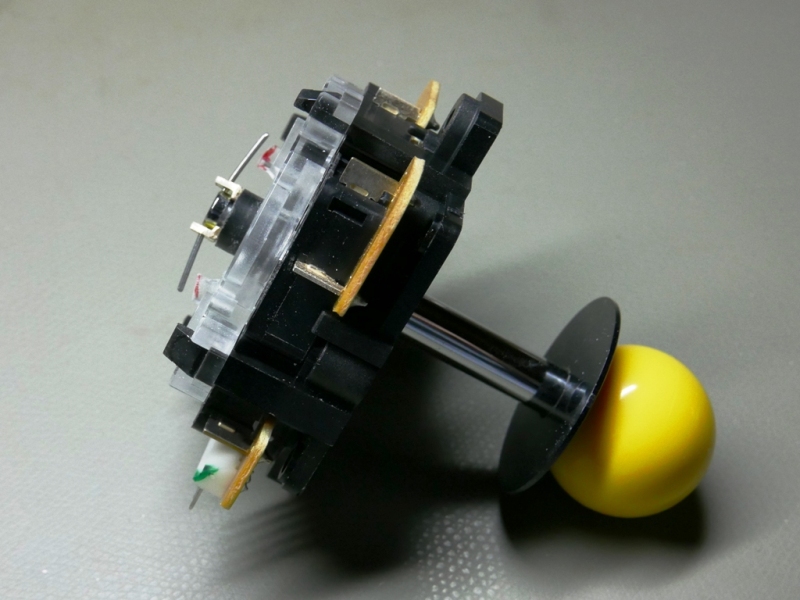
The side view shows how the T-bar stays clear of the restrictor plate's tabs in normal operation. When the joystick axis is pulled upwards, the T-bar will engage with the tabs, so the user can rotate the restrictor insert.
Your Sanwa JLF should now look like in the first picture at the top, and the final one above. You should be able to move and rotate the stick freely in normal operation. Pull it up gently while keeping it centered, rotate until it engages with the restrictor tabs, keep turning against the slight resistance you tweaked in step 1 above. Presto – you can switch between 4-way mode with proper “diamond” mechanical restriction, and 8-way mode with a square restrictor.
Occasionally, the T-bar will happen to be just below the two tabs when you pull it up. This is easily felt; just rotate the joystick a bit until you can pull it fully up, and then keep turning to switch the restrictor.
I have seen some reports that the Sanwas can hit the diagonal directions (with two micro-switches engaged) even when the restrictor is in the diamond position. This is independent of this mod, of course. If this causes problems with 4-way games, you can always define the joystick directions in MAME as “UP and not LEFT and not RIGHT” etc., so that the diagonals are never signaled to the game.